After a bit of tweaking and reading GPT API documentation I have created a simple process to integrate GPT into live analysis of data within PowerBI.
Leveraging a fully-functioning flow that integrates the Chat GPT API with Power BI offers numerous benefits to businesses. This powerful combination allows organisations to tap into the potential of AI-driven analysis, unlocking valuable insights from their datasets with minimal manual intervention. By automating the data analysis process, businesses can save time and resources, enabling employees to focus on higher-value tasks. The advanced natural language processing capabilities of GPT ensure that the generated insights are relevant and actionable, empowering decision-makers with data-driven recommendations. Furthermore, the seamless integration with Power BI ensures that these insights are easily accessible and visualised, promoting a data-driven culture across the organisation. Overall, the implementation of this flow presents an opportunity for businesses to stay competitive, enhance their decision-making processes, and drive growth through data-informed strategies.
Step 1: Prepare your Power BI dataset and streaming dataset Ensure that your Power BI dataset is correctly formatted and ready for analysis. Create a streaming dataset in Power BI to receive the Chat GPT API analysis results. Learn more about streaming datasets here:
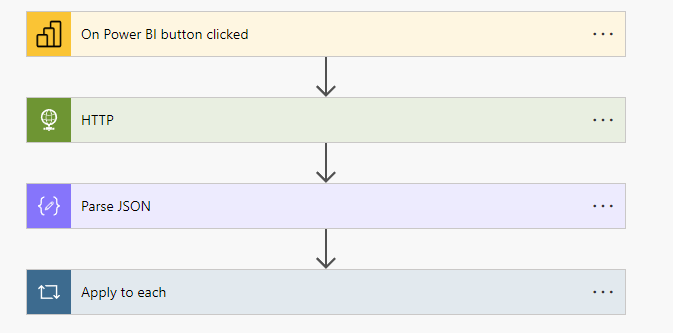
Step 2: Set up a Power Automate flow with a Power BI trigger Create a new Power Automate flow with a Power BI trigger to initiate the process. You can find more information on Power BI triggers in Power Automate here: https://docs.microsoft.com/en-gb/power-automate/connection-powerbi
Step 3: Obtain your Chat GPT API key Sign up for an API key from OpenAI to access the Chat GPT API. Refer to the API documentation for details: https://platform.openai.com/docs/guides/authentication
Step 4: Configure an HTTP action in Power Automate In your Power Automate flow, add an HTTP action to make a POST request to the Chat GPT API. Configure the HTTP action with the following settings:
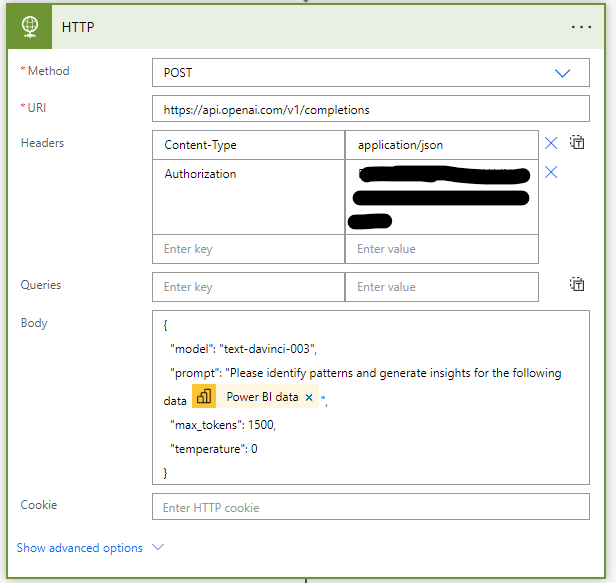
Alternative method would be :
- Method: POST
- URI: https://api.openai.com/v1/engines/davinci-codex/completions
- Headers:
- Key: ‘Content-Type’, Value: ‘application/json’
- Key: ‘Authorization’, Value: ‘Bearer YOUR_API_KEY’ (replace ‘YOUR_API_KEY’ with your actual API key)
- Body: Customize the JSON payload to specify the message input and output from the GPT API. For example:
{
“messages”: [
{“role”: “system”, “content”: “You are an AI that analyses Power BI datasets.”},
{“role”: “user”, “content”: “Analyse the dataset: {{your_dataset_trigger_variable}}”}
],
“max_tokens”: 100,
“temperature”: 0.5,
“top_p”: 1
}
Replace {{your_dataset_trigger_variable}} with the appropriate variable or expression from your Power BI trigger that contains the dataset to be analysed.
Step 5: Parse the JSON response from the Chat GPT API Add a ‘Parse JSON’ action to your flow to extract the analysis result from the Chat GPT API response. Use the following schema:
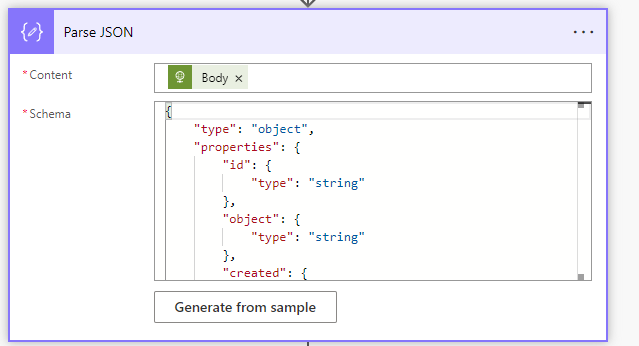
{
"type": "object",
"properties": {
"id": {"type": "string"},
"object": {"type": "string"},
"created": {"type": "integer"},
"model": {"type": "string"},
"usage": {
"type": "object",
"properties": {
"prompt_tokens": {"type": "integer"},
"completion_tokens": {"type": "integer"},
"total_tokens": {"type": "integer"}
}
},
"choices": {
"type": "array",
"items": {
"type": "object",
"properties": {
"text": {"type": "string"},
"index": {"type": "integer"},
"logprobs": {"type": "null"},
"finish_reason": {"type": "string"}
}
}
}
}
}
Step 6: Add the parsed analysis result to the Power BI streaming dataset Finally, add an action to your flow to send the parsed analysis result to your Power BI streaming dataset. Use the ‘Add rows to a dataset’ action and configure it with the appropriate dataset and table details, mapping the fields from the parsed JSON response accordingly.
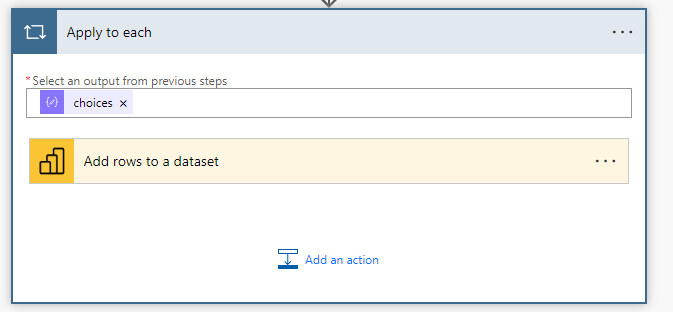
Save and test your flow to ensure that it works as expected. When the Power BI trigger initiates the flow, it should send the dataset to the Chat GPT API for analysis, parse the JSON response, and then update the streaming dataset in Power BI with the analysis result.
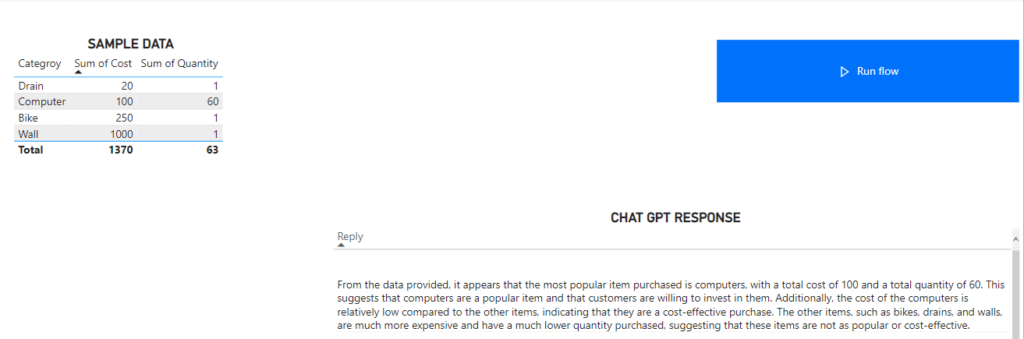
Step 7: Visualise the analysis results in Power BI Now that the analysis results are being added to the streaming dataset, you can create visuals in Power BI to display and analyse the information. To do this, go to your Power BI report and add a new visualisation that uses the streaming dataset as its data source. Configure the visualisation with the desired fields and customise its appearance to suit your needs.
Step 8: Monitor and optimise your flow Keep an eye on the performance and reliability of your Power Automate flow. Make any necessary adjustments to ensure that the flow runs smoothly and efficiently. You can use the flow analytics feature in Power Automate to monitor the flow’s performance: https://docs.microsoft.com/en-gb/power-automate/monitor-usage
Step 9: Iterate and improve your Chat GPT API interactions As you continue using the Chat GPT API to analyse your Power BI datasets, you may find opportunities to improve the quality and relevance of the generated insights. Experiment with different message inputs and API parameters to enhance the analysis and tailor it to your specific needs.
By following these steps, you should now have a fully-functioning Power Automate flow that utilises the Chat GPT API to analyse a Power BI dataset and updates a streaming dataset with the analysis results. This integration can help you unlock valuable insights from your data and enhance your decision-making capabilities.